
Second summer : getting plastered
- By Julia Pankratova
- 2014, 8 August
- 8 Comments
 It’s been one year, two months and eight days since the house build officially began. It’s been six months since our last post in February when we still had bare bricks and blocks for walls, rafters for ceilings and only two wood burners for warmth.
This house build has seen its first Christmas, with the Christmas tree that kept falling over in the mayhem of activity everywhere, and the Christmas decorations scattered all over the floor in puddles of water and muck; and it’s been through its first rustic St Valentines.
It’s the last month of our second summer of the build. We have surpassed yet another one of our completion deadlines, the 1st of June, which (naturally) gave us yet another new deadline of this Christmas, which is less than five months away and at last does not sounds as unrealistic as all the other deadlines we ever set for ourselves.
 Ever since I resumed my full time employment in March, things have slowed down considerably with no one any longer dedicated to the build 100% to do any research, make quick decisions, order timely deliveries or do prep jobs. Our already-topped-up budget was also coming to an end, so it was important not to rush things.
 Some of the biggest transformations of the past six months was the removal of the last of the old internal walls and raised concrete foundations and levelling off of the concrete slab in the hallway and the family bathroom. That was an all-weekend job of drilling, hammering, shovelling, mixing and levelling concrete. At the end of it we at last had one big hallway and had the full sight of the things that were to come 🙂 This also meant that the rest of the concrete flooring in the kitchen, utility, family bathroom and hallway could be finished at last too.
 As with all our downstairs concrete flooring, the foundations were covered with a layer of damp-proof sheeting, followed by hundreds of meters of copper pipes (I am now a proud capable plumbing chick who can solder! 🙂 ), 65mm Eco-Therm insulation and few hundred meters of the UFH (underfloor heating) piping pinned down to the insulation.
 It took ingenious creativity from Malcolm to design all our plumbing pipework and it took us weeks of messing around on weekends and dark evenings getting all the bits fit together, as well as making sure the UFH piping we had “stretched”. It just about did.
This was the last of our UFH to be connected to a 9-circuit manifold, which will be serving the kitchen, hallway, family bathroom, utility room, snug and study. The manifold is located in the kitchen’s (future) larder and is fed by the thermal heat store in the plant room, where there will be yet another manifold for the living room’s suspended floor UFH system.
 The overall result was impressive, if messy. Then came Martyn and covered it all up with screed in two days, and that was the last (EVER, I hope), we will ever see of any of that… All buried under muck, to keep us warm in winter 🙂 As Peter Timmons, a good friend of ours said : “You put so much effort, time and money into this, and no one will ever be able to imagine or appreciate the full extend of what went into it, as all they will ever see is just the floor…”.Which is basically what it is….
Kitchen’s ceiling was wired for all the possible combinations of lighting we might want to have and then insulated in between the rafters with 100mm rockwall for sound-insulation purposes before getting closed off with plasterboard.
 Next came our upstairs master bedroom. Studwork was built for the eaves and the en-suite partition walls which then got insulated with rockwool and plasterboarded, but not before we sorted the sanitaryware design, plumbing and fittings. We went for a wall-hung pan WC with a slim water cistern hidden in the studwork of the wall behind. Fitting the cisterns alone took us almost a day to sort out! Amateurs through and through… 🙂
 It took endless hours too to research and decide on the wetroom floor system, as we decided against shower trays for hygienic and aesthetic reasons. The proof will be in the pudding when it comes to installing it this weekend!
With the master bedroom being “in the roof”, there’s potential for heaps of storage space in the eaves, if we play it right, leaving the actual room as spacious and clutter-free as possible. A big hatch was left for long-term-storage access, which will be right behind our bed’s headrest.
 We have also designed and built alcoves for either side of the bed which would be back-lit with LED lighting for a soft indirect background light. The idea is to build bed-side units that could easily slide in an out of the alcoves depending on whether one wants them by the bed or out of the way. Well, that’s the theory anyway! 🙂
 With the completion of plasterborading in the en-suite, Malc couldn’t resist to try himself at plastering the only exposed blockwork wall in the en-suite, which would be pretty harmless anyway, since it would all be eventually tiled. Considering all lack of any previous experience, he did a great job, but did decide in the end to leave the skimming job to the professionals.
Next on it was the behemoth of all – the hallway, featuring a two-storey high ceiling, a staircase and an airwalk, which is a great feature, but is an absolute pain in practice if one needs an easy access to the ceiling…! 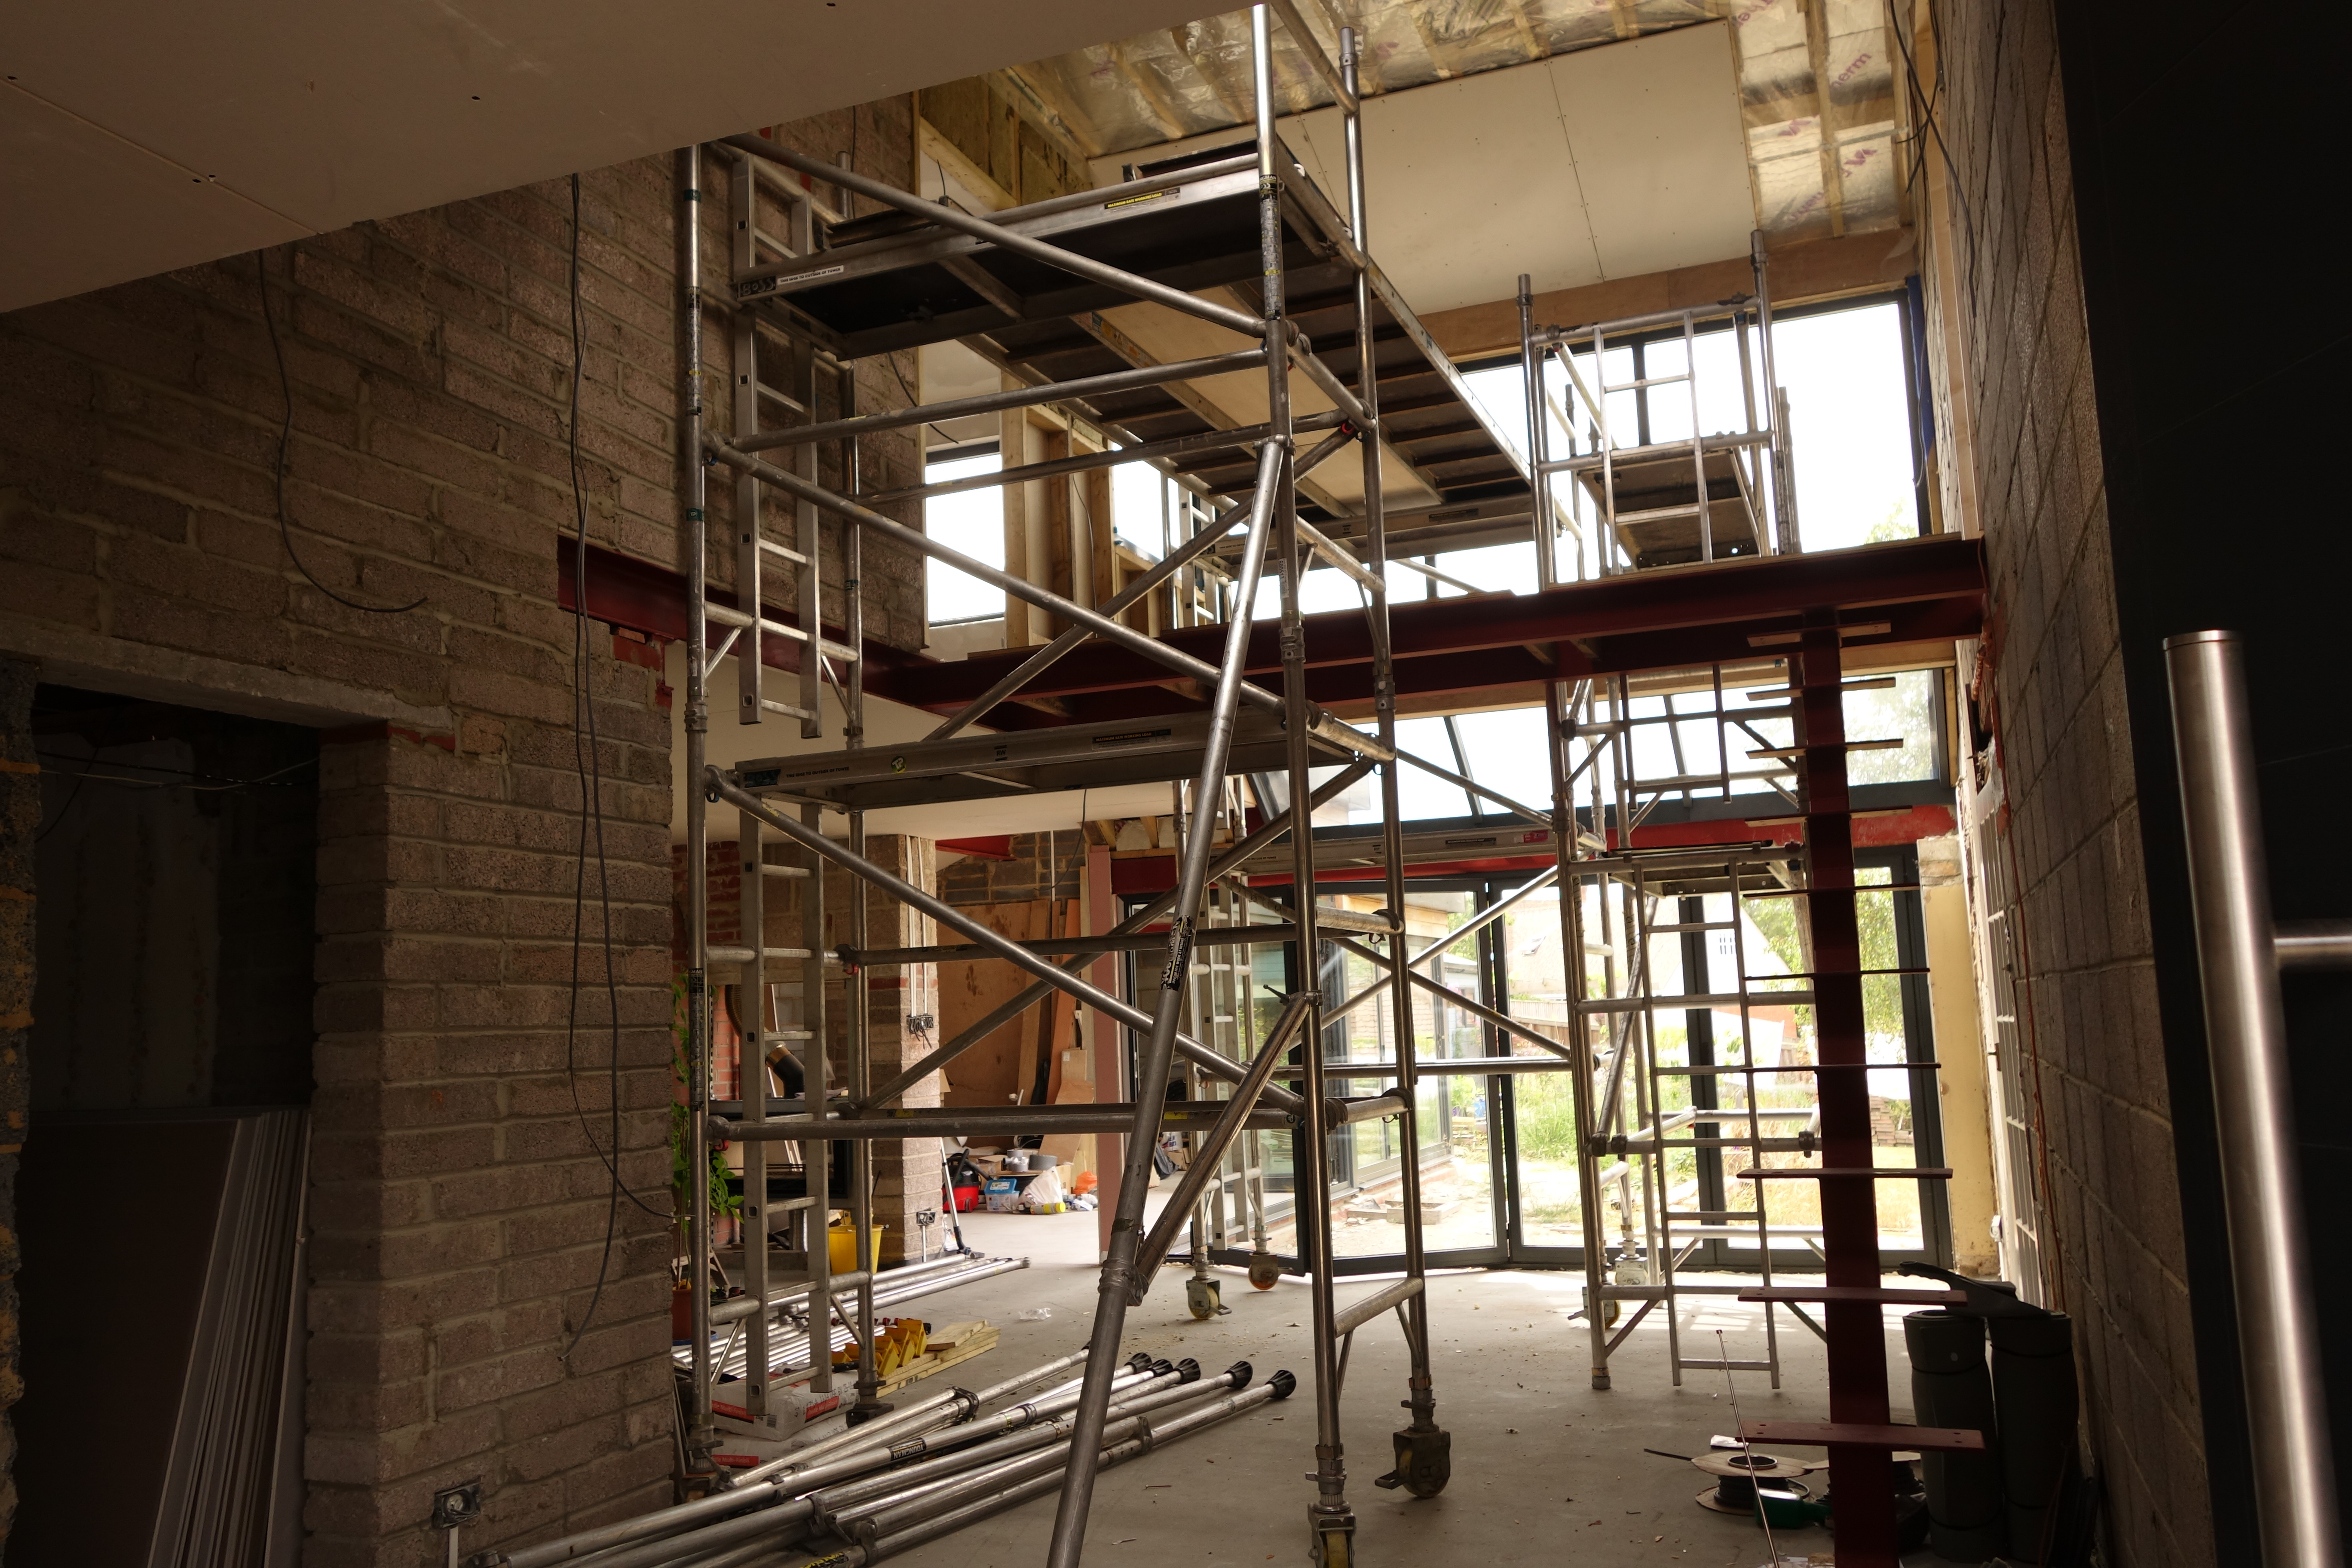 We hired two 4m high towers and two 4m staging boards. It took Malc and I a full weekend to do the electrics and plasterboarding of the flat and sloping ceiling in temperatures above +30C, with wasps, butterflies and giant dragonflies getting in the way. I believe half of that weekend we actually spent building and dismantling and reconfiguring and building and dismantling again the towers to make our way across the ceiling and around the airwalk and the staircase. At the end of that weekend, once the ceiling was boarded at last, we finally stopped attracting swarms of insects into the house with the beaming silver EcoTherm-insulated ceiling.
 On one of the hot summer weekends in between plasterboarding, yearning for some variety, the outdoors and the sunshine, we spent half a day, with the help of Peter Timmons, figuring out back garden patio design and the walkway from the front to the back of the house that would lead to our back garden patio. With the house being on the hill and the back of the house being “up in the air”, the only way to make it all one level quickly and cost-effectively without upsetting any more neighbours would be… Timber. The good old timber. We have lots of it left over from the old roof we took down when taking apart the old bungalow painstakingly bit by bit. It is to be the framework for all our decking and the raised walkway prior to any decking going down. The raised walkway also means we could have some outdoor storage under the deck, including the storage of 4x 800L waterbutts….
 The waterbutts. The plan has always been to add a rainwater harvesting system to the house for all our greywater and gardening needs. Moneywise however we couldn’t quite justify the expense of buying a proper tank and digging it into the ground at an additional expense of £X,XXX at the time when we hardly had a roof over our heads. Our good friend Bill Leadbetter however had successfully utilised some recycled orange juice concentrate containers at his allotment for all his allotment watering needs, and so we decided to give the idea a go.
Malc managed to get hold of four reasonably affordable 800L containers which had been used for water-soluble blue paint transportation. The containers arrived reasonably clean but with some blue paint residue still inside the tanks, which made us slightly nervous, as having toilets permanently stained blue wasn’t part of the original plan :).  Conveniently for us Peter Timmons turned up one weekend eager to help on the house…. He didn’t quite realise what he was getting himself into, literally, when he agreed to give the butts a good old clean-out… One of the challenges was that the only access to the inside of the 800 x 1000 x 1000 mm tanks was through a 150mm hatch at the top of the butts. Poles, old copper pipes, plastic bags, old towels, brushes, hoses, power washers, Fairy liquid, white spirit, Malc’s additional involvement and two hours later, there was a slight improvement on the inside of the butts, at the expense of Peter and Malc getting covered head to toe in the blue paint and smelling like oil riggers… Butts 1, boys 0 🙂
“All” that’s left to do now is to plumb the tanks to the main house plumbing system, get a solar panel and a pump and get it all working in time for the rainy reason.
Past winter’s gloom helped us appreciate the amount of glass we have in the house for the numerous large windows, bi-fold doors and roof lights, as the place remained reasonably bright despite the complete lack of electricity. This sunny summer also showed us just how amazing it is to open up all those bi-fold doors to lose the boundaries between the house and the garden. It’s one of the best investments we’ve made to date!
It did come however not without its small flaws, which was not due to quality or craftsmanship, but mis-communication! 🙂 One of our four-panel bi-folds door installations, even though true to the overall opening, was not exactly aligned to the steel above. This meant that we had a 1.5cm gap outside at one end where the frame did not meet the external aluminium cladding, as well as an uneven “lip” inside, where the steel above the door frame had a smaller overhang and would have made plastering and the overall final finish a nightmare…
 Phone calls, emails and awkward iPhone-picture-taking later, Kloeber (the original manufacturer and installer) came out all the way from Cambridge to have a look at the problem… In the end, to our big relief, Kloeber agreed to reinstall the doors the following week, at no extra cost to us. Quick, efficient, no mess, no fuss, as always. The same bunch of guys, with unchanged tea-drinking habits if maybe slightly altered life circumstances (one was getting married, and one was getting divorced). We always liked them. We still like them. We would use them again if we ever had to. And we would definitely recommend them. If Shane, Niel & Darren are reading this now – thank you again, guys! 😉
And then there was one. There is always one! Never planned or accounted for originally. But then it is us. And in our case there’s been quite a few like that. We just roll with it 🙂 ⇒We decided we wanted a brick feature wall. Not one, but two. In the snug and in the study. Had we thought about it 1.5 years ago, it would have been quicker, easier, (maybe) better and cheaper, and built as part of the overall house construction. But we hadn’t.
 Gumtree came to the rescue again to source locally some reclaimed bricks at half-price of new bricks, with the addition of character of age and history to them. We had laid blocks and bricks in small-ish quantities before, and hence thought we would accomplish this task fairly quickly. We started in the snug. Malc was mixing mortar and laying bricks whilst I was working as a labourer scrubbing and washing the bricks, chipping at the old mortar and pointing. Five hours later we managed to lay only 185 bricks in ten rows. We have another 15 rows to go…. We haven’t even started on the study. I know what we are going to be doing this weekend… 🙂
 All of the described above, including plasterboarding and bricking was to get us to a point where we could get plasters in this week to start plastering and skimming the walls. Which would then lead to painting, which then would mean flooring, which then would put a stop to the dust, muck, dirt and gereral mess everywhere.
Cliff The Plasterer, the forever busy elusive figure we had tried to get hold of for weeks, came in this Monday! GETTING PLASTERED has commenced at last!!! The master bedroom and the en-suite were the first to receive the treatment. And oh boy, did that make a difference! We have finally got homogenous walls and ceilings to look at, with no insulation, plasterboard, foam, breather membrane or any other nonsense in sight. Well.. almost… we are yet to decide on our window seat/storage and built-in wardrobe design and build the lot, before all traces of the “underground works” completely disappear.
 From the master bedroom Cliff swiftly moved onto the hallway. I thought Malc and I were quite clever with the towers. But our ingenuity paled in comparison to the construction that Cliff came up with using all the same tower bits to hand. All that’s needed is a few ropes and meshes to turn his construction into an alternative indoor Go-Ape 🙂
One week into plastering and we have one bedroom, an en-suite and half the complicated hallway finished. Give it another week, and we hope the hallway, a spare upstairs bedroom, kitchen and the utility room will be finished too, followed by the snug and the study once the brickwork is finished.
There is however a small stumbling block as far as the kitchen and the snug are concerned, as these can only be fully plastered once the double-sided woodburner between the two rooms is finished off with some fireboard.
The fab double-sided Stovax stove which we love, has brought us yet another conundrum. The stove is fairly new on the market with very limited and very vague information available on how to do its install or finish. I already mentioned in our previous post (Moving goal-posts) what a pain it was to figure out and source the studwork for the frame that the stove would fit into. Now we have to overcome another challenge on how to finish off the wall around the stove and close off the gap between the blockwork and the stove opening. After hours of trolling through web forums and manufacturers’ websites, we have decided to go for the Promat Supalux Promafour fireboard, which is suitable for high-performing high-heat-output woodstoves, and is non-combastible, withstanding temperatures of upto +1000C. The Supalux Promafour seems to be the only product to do the job, but is unfortunately hard to get hold of in small quantities and costs an arm and a leg! The Supalux-only version from Promat offers fire-resistance of upto +80C only and is fire-resistant for upto 4hrs only. However, there’s no way of knowing just how high the temperature can get inside the enclosed cavity above the stove, even though the flue and the stove are well insulated… We’d rather not take the risk, albeit the extra expense.
Onwards and upwards, we have brick walls to build, plastering jobs to finish and wetfloor systems and sanitaryware to install in our en-suite. We need to whitewash and paint the walls and the ceilings, tile the en-suite and the kitchen floor, build window seat and built-in wardrobes in the master bedroom, carpet and lay wooded floors, fix skirting boards, hang doors, install lighting, sockets and switches, finish off the staircase and the airwalk, design, build and install kitchen units, get sliding doors fitted in the study and the living room and plumb the rainwater harvesting system. And before our second winter of the build kicks in – we’ve got to do the external house render.
I.e. we still have a tonne of all the big and little tasks to do to make the house liveable and comfortable for a change and ready for the next cold and rainy season.
And all of that’s before we even start to think about carrying on doing the rest of the major work on the living room (suspended floor insulation, UFH, ceiling sound insulation, electrics, plasterboarding, plastering, painting and flooring), the adjacent bedroom (same as living room, excluding the UHF), the family bathroom (same as living room with the addition of wetfloor system and sanitary ware installation) ***WE COULD HAVE A HOT BATH AT LAST!!! 🙂 ***, another bedroom (skimming and flooring) and a shower-room (re-tiling / upgrading, budget-dependent).
And then there is the rear garden patio and the front drive and front garden landscaping, and the green sedum roof planting, all patiently awaiting their turn. And all the funky furniture and lighting design and picture-framing and all the other fab side-kick projects that we are already pondering about… Exciting times ahead 🙂

St Valentines, 14.02.2014
Whilst Cliff & Darren The Plasterers were working on site this week, a nosy elderly lady apparently poked her nose through the open front door and commented on the state of our front doorstep, which was allegedly an H&S tripping hazard and apparently she was going to report us to her employers (whoever they were)… She then asked for the house number and wandered off.
There are four outcomes to this incident:
- We will receive a formal letter from the HSE informing us of grossly breaching some sort of an H&S law, even though the tripping hazard is on our private property and should be none of anybody’s business
- We will receive lots of spam mail on how to improve H&S on site
- All trades in the area will receive cold calls asking them whether they ever worked at this address and suggesting that they may be entitled to a compensation
- Any combination of / all three of the above
Either way, I am pretty sure we will find out soon enough one way or another 🙂

Hi Julia, I am intending to use the Promafour-Supalux boards soon to build a false chimney breast around a Stovax Riva Studio woodburning stove. My understanding was that one side of the boards has a smooth finish that doesn’t need plastering – is this not the case? Or was there another reason that you decided to plaster the boards? I was hoping to avoid having to plaster the boards and so avoid getting the cracking around the stove that you have mentioned.
Thanks for all the useful info in your blog!
Hi Simon, the board indeed is smooth on one side so depending on how you do it and how many boards you use – you could probably potentially just paint it. However, if you use more than one board you still have taping and dry-lining to do so the potential for cracking is still there. Also depends on the size of boards you go for, as they come in standard 1.2×2.4m size as well as half size. Our actual opening wasn’t that big and we got away with 2 half sized boards, one per side to cover up the open chamber / cage that the stove sits in. It was also more cost effective as the boards are expensive. Half size boards are also not as heavy and are slightly easier to work with. The rest was just ordinary plasterboard and ordinary skimcoat plaster to go over the lot. Hope this helps… Apology for the late reply, we’ve been too busy full-time working and house building so slightly neglected the site. Happy to chat on the phone too if you have any further questions. Just sent us your contacts through out Contact page.
Hi,
Feel exhausted just reading your blog!
I was interested in your use of promafour supalux for the stove. How did you attach to the blockwork – what fixings / adhesive did you use?
Thanks.
Hi Liz,
the Promafour Supalux boards worked really well and I am so glad we got them instead of anything else. The board gets very hot when the stove is lit, hence works as an additional radiator in the room. Which means that the air in the cavity behind, above the stove where the flue is must get very-very… The boards were expensive but were definitely worth the peace of mind.
To fix the boards we used normal plasterboard screws to fix the boards to the steel framework that the stove sits in, as well as normal dry-wall fixing dot-and-dab plaster to fix to the block work around the edges.
Our plasterer used normal plaster on the outside but we do wonder whether we should have gone for something more heat-resistant. We have had a few cracks to the side on the fireplace, as well as spiderweb-like small cracks above the fireplace, which are hardly noticeable. I have decided that we will let one winter pass, let all the plasterwork settle, and then do any crack repairs.
Out of the four half-sized boards (they can come in half sizes) we only used three. We might use the leftover board behind the woodburning stove in the living room when we start working on that room, as it could be good at reflecting some of the heat back into the room more efficiently than the thermal blocks we have behind the stove.
By the way, the boards are very heavy, very hard, are hard to cut, yet they can break easily. We used a jigsaw to cut out the fireplace opening, living the board as one full piece.
Good luck with your project!
Bet you get warm water initially from the cold tap 😉
I don’t think we do Lemmy. Why the assumption? All copper pipes were well insulated, cold from hot, before the screed went down, so hopefully shouldn’t have too many issues. Having said that, we still have not moved into our new kitchen, so don’t know for sure!!! Same for the UHF – we had it on a couple of times so far just for testing, but again, because we are not living in that part of the house yet, can’t say for sure what initial water temperature we will be getting out of the cold tap.
Found your articles about the stovax duplex really useful. We are just about to install one and have found the same issue with not much clear advice out theSE, so was really pleased to happen on your blog. We are building one solid block work wall then making metal stud work for a false chimney breast the other side. Hence one room view will be a flush wall and the other will have the stud work chimney breast. We have a twin lined flue, so hopefully the heat within the chimney breast will be reduced, but agree to go for the 1000 degree resistant board. Our intention is to use heat resistant plaster, then just paint the walls. I was just wondering if you have got to the point of filling in your chimney and boarding it, if so, how did you get on? Any advice or experiences gratefully received. Thanks
Hi Nicola, we got the boards at last, which wasn’t an easy task as nobody tends to stocks the Promafour type of the Promat boards. We managed to get the half-size boards through our regular Travis Perkins route and are still pondering over the installation! Our plasterer is back in a week’s time so we definitely will need to come up with a way to fill in the gaps with the boards by then 🙂 In two weeks we will for sure have had something figured out and accomplished so would be able to update you then how we got on!