
Moving goal-posts
- By Julia Pankratova
- 2014, 6 February
- 10 Comments

Is it warm yet?
It’s a gloomy, cold, rainy February day. And yes, we are warmer now. It’s been nearly three months since our last post on the house build, so this one is packed with updates of the latest what-we’ve-been-up-to’s.
 Mid-November Ollibees saw its busiest two days since the build had began, with sixteen people busying themselves around the site : eight glazers, two plumbers, two roofers, a stove fitter, a brickie as well as other random trade folk who came and went throughout the day, not to mention numerous truck drivers, as well as Malc and myself… The site represented one giant anthill harmoniously humming in endless commotion, only calming down whenever teas and coffees were served. Alas, most of our cups and mugs have fallen victims to falls from brick walls, scaffolds and roofs by now. That’s when our art of staggered tea-serving took root.
First, for the biggest biggies that happened since then:
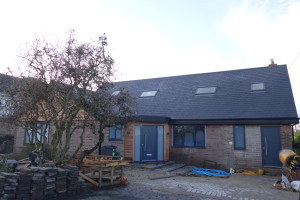
 1. All glass and external doors are in at last, including three solid timber doors, seven Velux windows, four bi-fold doors, a glass roof and twelve new and replacement windows and glass panels, all installed before Christmas to get us weather-tight just before all the deluge kicked in.
Glazing ended up being by far one of the most expensive “single” items of the house build, amounting to nearly 30% of the total build cost to date (£51,000)! It is an investment we chose to make in order to hopefully not worry about it for a long time to come. 
 The alu-cased triple-glazing units are solidly built, requiring little or no maintenance and keep indoors in and outdoors out as far as heat-loss / -gain are concerned, aiding energy efficiency and keeping running costs down.
At this point in time we are still in no position to comment on how much better the U-values are in comparison to UPVC, since the house is still not fully insulated. However, from the look and feel point of view – they beat the traditional plastic stuff hands down. And although they may have slightly higher U-values than timber-framed windows, from the low-maintenance point of view, they are a better choice for us, the lazy lot!
The last bit left to finish off is some aluminium cladding around the bi-fold door pillars and steels, and which is still work-in-progress.
 2. All the roofing jobs are finished too, including slating, GRP flat roofs and fitting fascias, soffits and guttering.
Slating took nine weeks to complete instead of the originally quoted four. Lucky for us (if not for the roofer) it was a fixed-price job… The choice of the Canadian slate, although being probably the second most expensive item in the build budget (£15,000 including labour), was well worth the spend. We didn’t have a single broken or chipped or brittle piece of slate delivered, the roof will last us a lifetime and the colour and the final finish are exactly what we were after. Our initial worry that the slate may not lie flat and show off every small bump of the timber-framed roof fortunately went ungrounded.
A layer of 75mm insulation, battens and counter battens that went atop the rafters disguised most of the unevenness. And since the roof is still going to naturally move whilst the timbers are drying out, there would be little point in doing any corrections from the onset anyhow. All in all, top scores.
 Which cannot be said however about our flat roofs, which became a really sticky point. Literally. The Cure-It GRP system did not live up to our expectations, whether weather- or skill- dependent… The resin catalyst (summer and winter one) took forever to set and caused all sorts of grief… Even now, two months since the work has been complete the resin remains slightly tacky. Good to keep flies away perhaps. Not so good when trying to work on top of that roof! The overall look is good however. I cannot wait for the warmer months to put some grit and soil down and plant sedum and alpine plants to soften the look, attract some wildlife into our garden and help soak up some of that rain!
 Talking about sedum, I have now found four different types of sedum, including one in our own garden, which I have been now propagating by dissecting and planting small sections in seedling compost to be ready for the Spring. None of them have died yet which is a good sign :). These plants tend to be very resilient and seem to grow even when chucked on the ground without any further care. A perfect type of garden plant for hard-to-reach roof spaces!
 3. All the external timber cladding has now been completed too, requiring unsurprisingly 1.5 times more cedar than originally calculated. We did get a good deal from Artisan Timber and the final finish is gorgeous, even if I say so myself! The off-cuts make for good fire-starters too and smell delish 🙂
 All that remains to do on the exterior of the house now is to spray-render the exposed brickwork. We’ve been advised not to render until the weather gets drier and warmer. We can however apparently use a quick-drying mix, which may be the option we go for in order to waterproof the thermalite blockwork which is currently being soaked in every rain downpour.
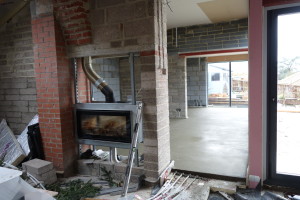
 4. On the heating front: our both wood burning stoves are in and burning! The Stovax Riva Studio Duplex stove is quite a centrepiece. Getting a dual-aspect wood burner to share between two rooms was a good decision. The stove is installed in a wall between the kitchen/diner and the snug and pumps out 9kW of heat, enough to keep the both room spaces comfortably warm. An external air-duct kit feeds the stove with external air directly from the outside without undermining our efforts to stay as insulated and air-tight as possible. And watching logs burn through the large glass windows is mesmerising… For all this it deserves brownie points galore!
The only time we had to faff about the Stovax was when it came to the actual physical installation involving a strut framework which had to be sourced separately. After hours on self-building and trades forums and websites, we went for Unistrut, especially when Unistrut’s UK sales manager offered his personal service specing out for us the exact requirements for our framework based on the stove’s installation manual, which even Stovax’s technical team could not do for us. This must have been the tiniest of sales for the Unistrut guy on the grand scale of things, yet was a truly 5-star customer service! All in all, we love the stove and so far had no issues with it, and cannot wait to get the surrounding wall complete with some fireproof plasterboard (HETAS-approved Skamolex, as per our stove installer’s advice) to give the stove the final neat minimalist look and finish it deserves!
 Our experience with our Morso DB15 wood burner with the back boiler on the other hand was a very different story. The stove is beautiful and is solidly built. BUT, it didn’t work from the outset!… We received one of the very first stoves manufactured (surprisingly in the UK, not Denmark!) and shipped (not without delays), and whether due to the rush to meet the delivery deadlines or for some other reason, we had more faults with that stove than we could shake a stick at! The burner had a huge gap inside and at the back which were discovered by us after weeks of investigating why the stove’s heat output was not up to scratch. The gaps were letting too much external air in, disallowing the stove to get hot enough to heat nor the room, neither the water. Something that was meant to be pumping out 9kW to the water and 6kW to the room, instead took 5hrs to bring up the water temperature in the heat store by only 20C and the room temperature by only 5C!
The amount of time we, our plumber and our stove installer spent trying to figure out the root of the problem, the time all of us spent individually on the phone to Morso’s technical design team and management, and the amount of logs we burnt trying to keep us warm beggars belief! A month in and just before Christmas a Morso sales guy came in to fit a missing gasket in the hope to fix the issue; that however hardly made a difference; neither did the two bottles of wines he left behind as a “we are sorry” gesture (it did taste nice though!).
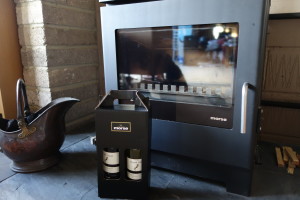
In the end Morso made a decision in early January to ship us a replacement stove which we got installed last week. The difference is huge. The stove starts off much quicker, burns much hotter and cleaner, warming up the room and the water much closer to the temperatures where it should be and in much shorter a time, and it has some slight improvements to the actual design too, including vent lever mechanism, bolt sizes on the side etc. Morso promised to pick up all the expenses in connection with the stove’s refit. We might be asking to cover the cost of the two tonne of logs too which we burnt in vain trying to warm up all that water over the past two months! 😉
Interestingly enough, ever since one of our previous posts The Great Expectations was posted mentioning the Morso DB15 stove, we have had a huge amount of comments, emails and phone calls from people from around Europe asking us for our opinion and advice on the stove (Ollibees blog comes up on the first page of the Google search for “Morso DB15 review” search). I hope this latest post sheds some more light on the topic and will help others make a more informed decision on the stove’s performance. If still in doubt – do feel free to send in your questions and we will do our best to help!

5. Plumbing and heating in general remain work-in-progress until we complete all our underfloor heating and all the bathroom and kitchen plumbing.
The solar thermal panels are now connected to the heat store using the separately sourced super expensive dual pre-insulated copper piping, and even on dull and rainy days as today the panels do seem to generate some heat. One of the next side-kick projects might be to look into devising a control and monitoring panel and software for the whole system in order to see how much of our heat gain in the heat store comes from where and when (solar VS wood burner VS gas boiler). This would require some time and ingenuity… unless, that is, we give in and go for an off-the-shelf product 😉

 Oh, yeah, and I did write a long constructive yet polite email to the Viridian Solar sales team (in the spirit of Danny Bhoy’s “Dear Epson” stand-up) just before Christmas commenting and giving suggestions for improvement on the ill-fitting design of the flashing kits and on the mis-information at the point of sale on the missing vital components required to complete the install, only to be politely told over the phone that more or less it was all my fault and I was not entitled to any compensation, monetarily or otherwise. And no, I would not be getting a crate of Champagne to say “Viridian were sorry”… Because they were clearly not. I then received another follow-up email from Viridian in the new year asking how I was getting on with the panels and if I could confirm my delivery address… in case I still was interested in receiving my (one) “requested” complimentary bottle of Champagne…
 The underfloor heating (UFH)…. it’s finally here. We had six quotes from different manufacturers, quoting between £4,500 and £6,5000 to supply enough materials to lay the UFH in the study, snug, kitchen, hallway, utility and family bathroom (all on the new fully insulated concrete slab), living room and bedroom 3 (on suspended floor joists) and bedroom 4 and en-suit (as slim profile floating system atop of the old concrete slab). None of the quotes came with drawings, unless we committed to the purchase, so comparing like-for-like turned into a Mission Impossible. Our choice in the end was to go with Solflex, who are part of Travis Perkin, who being our primary building materials supplier agreed on doing us a good deal.
The study and the snug have been the first rooms to be fitted with the UFH last week for logical and logistical reasons, each room calling for a 100m coil of flexi piping, some staples and brackets. The flexi-pipe is a riot to work with, especially if one does it for the first time, lays it out, gets the layout wrong (and then trice more) and then spends the next 2hrs trying to work with 100m of uncoiled and far-from-flexible flexi piping in a 15m.sq! Twister game is the closest one can get to the experience, with the addition of thumping on the head every now and again by the unruly coils. The second coil went down easier once we figured out the easiest layout and worked methodically between Malcolm and myself uncoiling and stapling the pipe down to the insulation as we went along.
 In every room featuring the new concrete foundations (snug, study, kitchen, utility, hallway, family bathroom), the foundations have to be covered first with a layer of dump-proof sheeting and insulated with 65mm Eco-Therm insulation before the UFH is fitted. Laying the insulation turned out to be far from simple requiring cutting out channels on the underside for the electrical wiring conduits and any piping. Once down, the insulation is then surrounded by more upright 25mm insulation all around the perimeter of the room serving as a thermal bridge, and every gap, fold and crease is taped over with alu foil. To top it all off, a minimum of 65mm of screed is poured on top to complete the basic floor structure, before any underlay and floor covering (timber, tile or carpet) goes on.
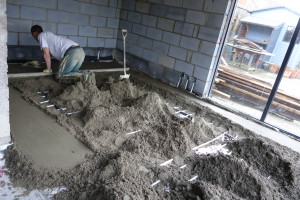
Yesterday saw Martin the screeder and his helper Dow-boy laying our floor screed for for the first time in the snug and the study, which was a big milestone for us. Due to a reasonably small floor area, the screed, consisting of marine grit, Portland cement, fibres and water, was mixed in the front garden and then wheelbarrowed in for Martin to do his magic of turning it into a smooth and shiny floor. The rest of the screeding area will be complete using the same semi-dry mix and pumped using a 3″ hose.

The screed floor should be ready for light foot traffic within 24hrs and the top 10mm will set hard within the first week. The rest will be drying at a rate of 1mm a day, meaning that it will take nearly 2 months before we can lay any wooden flooring.
This weekend we will be shifting all our building tools and materials from the kitchen and hallway area into newly screeded area and will then be able to continue with floor insulation and the UFH installation in the rest of the house before the rest of the screed goes on.
Which subsequently means that we will then be able to start plaster-boarding the walls downstairs, getting the site to look more like a normal house!
A few more things deserve mentioning in this post as considerable milestones:
 – The electrics. So far we managed to do most of the first fix electrics ourselves. The task can be laborious at times yet very satisfying, especially when watching someone else chasing cable channels with a drill in a rock-hard solid concrete wall. Peter Timmons, our good friend and colleague deserves a medal for his efforts (as well as for all his help with the floor insulation and plasterboarding!!!)!
As far as lighting and socket layouts are concerned, the philosophy is “the more the better” to cater for any eventuality, with cable runs for spotlights, downlights, lamp sockets, normal sockets, networking and TV aerials in every room in lots of places. Just to be sure, to be sure. All lights will be LED and dimmable… CEF is now our preferred supplier for all our electrical goods. We like them 🙂
 – Plaster-boarding. We have considered boarding VS plastering. We tried the former. It’s no rocket science. We can do it. We are sticking with it.
All ceilings and most walls have to be sheeted with a plastic vapour membrane before plasterboard goes on, based on our build reg requirements. Bedroom 2 on the first floor was the first room to be boarded floor to ceiling. Plasterboarding (in our amateur case) requires at least two people, one to hold the board and the other to fix it to the timbers behind with some screws. When it came to ceilings – having three people was a massive advantage.  That’s when Peter Timmons came in handy again!
Once the boards are in place, any holes and gaps are filled with a filler. Sanding down that filler is a tedious and time-consuming task, not to mention the fact that one gets absolutely covered in a thick layer of white powder from top to bottom like in a thick layer of icing sugar. Not pleasant…
One room down, many more to go….
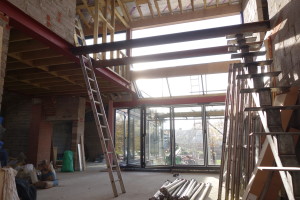
 – Staircase and walkway. There are only two rooms upstairs, the master bedroom with an en-suite, and the bedroom 2. The two are separated by the hallway and linked up by the walkway which the staircase is adjacent to.
The decision to start building the main steel structure for the staircase and the walkway was made in a rush when we found out that our preferred welder was disappearing to Oz for an unknown period of time. The steel structure was drawn up on half an A5 piece of paper at the local pub. The materials were ordered overnight and delivered within the next two days. All measurements, angle calculations and design adjustments were made as the structure was being erected and taking shape. It took a record 4.5 days from the idea inception to the build completion! Tom the welder was finishing off the last bits of welding with 4hrs to go before his flight. It was fun 🙂
The welding is not entirely complete and needs touching up in a few places. The next steps would be to paint the steels in the colour of our choice, source and install hardwood timber for the treads and the walkway planks and design and install the glass and steel railings and the balustrade.


Malc promised we would be weather-tight by the end of September and celebrate Christmas in the house. The former was a complete miss, and the latter was his interpretation of “celebrating Christmas” – we did have a beautiful Christmas tree to make up for what wasn’t otherwise there 🙂 .
Our new anticipated finish date for the build now is the 3rd of June. The day of my birthday and the day when the main build started last year… Fingers cross..! 🙂

Hi,
It’s been a while since you have had your Morso stove and was so
Needing now how it is performing? It’s high on our list and looks great but does your still smoke, does it heat effectively and efficiently both the room and the water? Are you generally happy with it?
I hope you are settle in your new home and enjoying the benefits of having built your own home, how wonderful!
Ben
Hi Ben,
the stove is still as good and looks fab in our new living room (now that we have the room plastered and have the flooring in and can actual call that room a living room at last :)). Ever since we receive the stove replacement (the one we had received from the start was THE very first one from the production line that was rushed and not properly QA’d), we had no complaints whatsoever. The water does get hot (in winter, when we light the fire :)) but be mindful, as with all other fires, what wood you use. If you use softwood or wet wood that offers little heat output, then it will take longer for the water to heat up and for the pump to kick in. It can be a little on the noisy side when the pump does kick in and you suddenly hear the loud water flow bubbling, but a) it’s only for a brief few seconds, and b) it actually makes us feel good by reminding us that it’s not just a pretty fireplace heating up the room 😀
Morso’s UK sales team did a sterling job when we initially had a problem – I am sure they will be helpful if you give them a ring, in case you have any doubts. You can always mention us, they still remember us I believe as I think a lot of their customers refer to our blog.
And thank you for the kind words on the house. It is indeed very rewarding to build own house. I am still pinching myself sitting here on a deck in the garden on a Friday, sipping a glass of Prosecco. I am going to be updating the blog this weekend, one year later since the last post, so if interested – do come back to see how far we’ve progressed 😉
Hi there julia. In the end I did the obvious ? and phoned morso .The chap I spoke
to remembered you and clarified the matter.Probably will go with morso.
Thanks for the reply
Regards
Hi there
Read with great interest the comment regarding the db15 .I’d been looking at the dunsley Yorkshire v. Morso and decided on the morso as the Yorkshire looks a little dated .Then I came across your blog ,which left me unsure; are you saying the first batch of stoves were problematic and later ones OK ? Or were you unfortunate to buy a one off that had escaped quality control ? Ive recently seen these at a really good price ! and then I wondered why ; are they trying to off load dodgy stock?
Regards Alex
Hi Alex, the stove we got was the very first stove that went out of the factory and I think they rushed it to get it to us quick so there were bits missing including welding! They were very good at post-sales support and once they realised what the problem was – they replaced it with a brand new fully QAd stove. It has performed to its spec fully ever since and we could not be happier with our choice. Good luck with making the decision!
Hi,
I too am looking at the Stovax riva duplex – do you have details of the struts as we would need the same. Also, can you tell me how clean the glass stays?
Anne
Hi Anne, the glass stays fairly clean. All depends on what you burn. The drier the logs – the better. Cleaning is very easy though. We use wet newspaper and the ashes from the stove which is free, environmentally friendly and quick. The stove also lights in no time and is much easier to work with than our Morso wood burner.
With regards to the struts. The below was in the email from the sales manager from Unistrut who helped us with our choice of the metal work. Hope this helps!
“The lengths of Unistrut you require is our P1000T Pre – Galv (page 5), this comes in 3 metre lengths and you cut it down to suit the frame you are looking to build, P1026 Bracket is needed for the corners (page 21) then inside our strut is a spring nut (page 16) this goes underneath where the P1026 bracket is and use a Setscrew (page 33) to fasten is all together.
Our product is Pre – Galv Steel so is non-combustible material”
Hi,
I must congratulate you on your great articles. I was looking for Morso DB15 reviews and found you!
I am weighing up boiler stoves and only have two Defra options – the Morso DB15 or the Dunsley Yorkshire.
I prefer the style of the DB15. The Yorkshire has good reviews, though it’s weak(er) point is the air wash. What is your view on your DB15 airwash? Does it keep the glass clear?
Many thanks
Baz
Hi Baz,
the DB15 stove is great. I cannot comment much on airwash, as I had never previously owned another stove, so cannot do a comparison. All I can say is that the clearness of the glass seems to depend on the dryness of the logs and your lighting technique… we have learnt to keep the top vents open and the door slightly ajar until the kindling and the logs catch proper fire and start getting hot. That gets the burning going quicker. You do end up more often than not with some moisture on the glass which then, depending on the wood used, may or may not stain the glass brown… Again, depending on the fuel, burning time and temperature, the brown staining does sometimes completely disappear, or remain partially on the glass.
At any rate, we end up cleaning the glass every day before lighting the stove. The best and cheapest way to clean the glass that we found is using a scrunched-up wet newspaper dipped in the ashes from the pan and gently rubbing the glass with it, before wiping all clean. Does the job every time! 🙂
Good luck with the choice that you make!
Looking good.